Thursday 2 September 2021

Launch X-431 TSGUN Diagnose & Program Porsche CayenneTPMS Sensors OK

 Problem: Porsche Cayenne TPMS sometimes is not working.

Tools used: Launch X-431 TSGUN TPMS + LTR-01 RF Sensor

Launch X-431 TSGUN to diagnose & program TPMS sensors for a Porsche Cayenne 2010 as an example. Supports to work with Launch X-431 Pro3, X-431 Pro5, X-431 PADIII, X-431 PAD V, X-431 V, X-431 V+, X-431 Pros V4.0 via Bluetooth.

Here you are:

How to diagnose TPMS via X-431 TSGUN?

Steps:
Having been selected car model, long press “OK” button and aim X-431 TSGUN at the tire pressure sensor.
There’s a trouble found: OEM sensor battery running low.

How to program TPMS sensors via X-431 TSGUN?

Place a new Launch RF Sensor near, X-431 TSGUN will identify it soon, press  “Programming”.

Wait programming until 100%...
Note: please keep the device close to the tire pressure sensor that needs to be activated.

Succeed!
It’ ll show the sensor details on screen.
The operation is easy, just one-step to finish.

How to active new TPMS sensor via X-431 TSGUN?

After replacing the new RF Sensors into 4 tires.
  1. Select TPMS function and correct car model.
  2. Take X-431 TSGUN close to tire and long press “OK” button in turns.
All RF sensors are activated!


Test new sensors
  1. Go back to diagnose TPMS system on X-431 scanner again. There’s no fault code found.
  2. Test drive about 15 minutes. When sensor reading displaying on dashboard that means all done.


Done!

Tuesday 17 August 2021

How to fix can't find the “SCN Coding” file in Launch X431 PAD VII?

One Dutch customer gave feedback that he can’t find the “SCN Coding” option in Launch X-431 PAD VII while other users do have. That’s because he didn’t open the configuration file to start online programming function.

 can't find the “SCN Coding”  file in Launch X431 PAD VII 01can't find the “SCN Coding”  file in Launch X431 PAD VII 02

How to start online programming function?

The operation steps apply to Launch X431 PAD V, X-431 PAD VII. In addition to US, Canada & Spain, the rest of region can follow the procedure below to set up.


The online programming option won’t display in Home page, please search it in corresponding diagnostic software.


Steps

  1. Find out “ini”file in the path: Others >> Device >> File manager >> cnlaunch file >> X431PADV >> assets

How to start Launch online programming function 01

How to start Launch online programming function 02

 How to start Launch online programming function 03

How to start Launch online programming function 04

  1. Open and edit “ini”file via text editor, search for fields “OnlineFlash” & “Flash”.

- The defaults are “0”, which means software can’t support online programming.

- Change the defaults to “1”, then save.

- Once saved successfully, the defaults will display “1”, which means software can support online programming.

How to start Launch online programming function 05

Done!

Now you can start to use the online programming function!


This is how to open and start using the online programming function for Launch X431 PAD V & X-431 PAD VII for the first time.

http://blog.obd2shop.co.uk/


Tuesday 10 August 2021

Launch X-431 Diagnostic Feedback Guide

 Problem

When I was using the Launch X-PROG 3 and X431 V+ to do key programming, it can read the key and the keyboard lighted up. But the button didn’t respond when pressing “Return” or “Confirm”. The software stopped, no more communication, I can only exit all procedures.


The problem still exists when diagnosing with a car, it prompts “Please terminate the current function first”.

Launch X-431 Diagnostic Feedback Guide 01


Solution

Please submit the diagnostic feedback, Launch engineer will help to solve problem soon.


Steps

Menu >> Settings >> Diagnostic Feedback >> Vehicle Model/ Operation >> Select latest record, Next

Launch X-431 Diagnostic Feedback Guide 02


The way to do diagnostic feedback applies to X431 V, X431 PAD V(PAD 5), X431 PAD VII(PAD 7) as well.


Hope this can help.

http://blog.obd2shop.co.uk/how-to-do-diagnostic-feedback-for-launch-x431-x-prog-3/


Tuesday 25 May 2021

How to Recover VCM II Diagnostic Tool Factory Settings?

Problem

My VCM2 Diagnostic Tool for Ford is unable to connect to software after the upgrade, how to recover factory settings? Or any ideas to reconnect to software? 


Solution

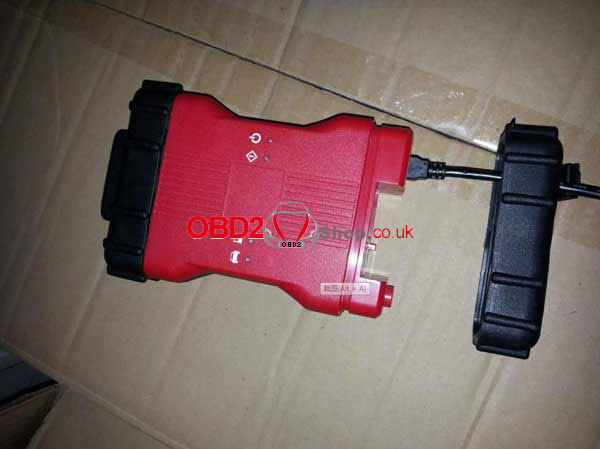
1. Removed the rubber head as image;

recover-vcm2-diagnostic-tool-factory-settings-01


2. Connect VCM II & computer(IDS software installed) via USB cable, long-press RESET button until hearing a beep;

recover-vcm2-diagnostic-tool-factory-settings-02

recover-vcm2-diagnostic-tool-factory-settings-03


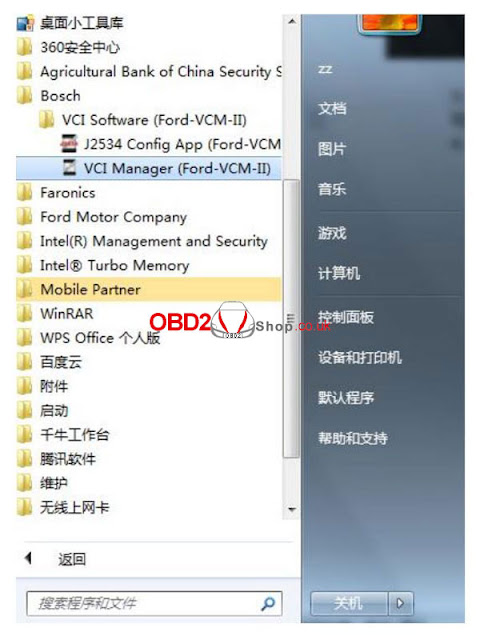
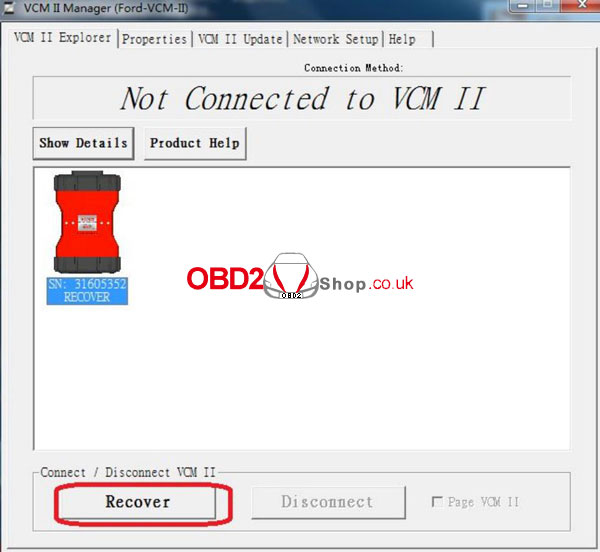
3. Run Bosch\VCI Software(Ford-VCM-II)\VCI Manger(Ford-VCM-II);

recover-vcm2-diagnostic-tool-factory-settings-04

4. When coming up with a prompt as the image below, it means to ready for recovery.

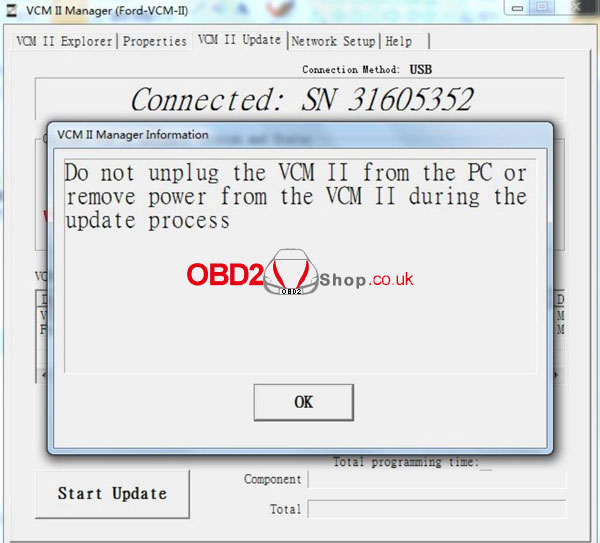
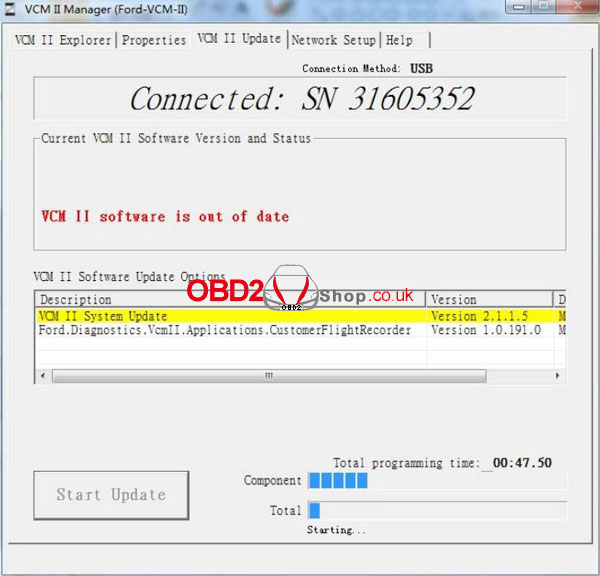
Press “Recover >> Start update >> OK”, it will start writing the latest firmware...

(Note: Do not unplug the VCM II from the PC or remove power from the VCM II during the update process)

recover-vcm2-diagnostic-tool-factory-settings-05

recover-vcm2-diagnostic-tool-factory-settings-06

recover-vcm2-diagnostic-tool-factory-settings-07


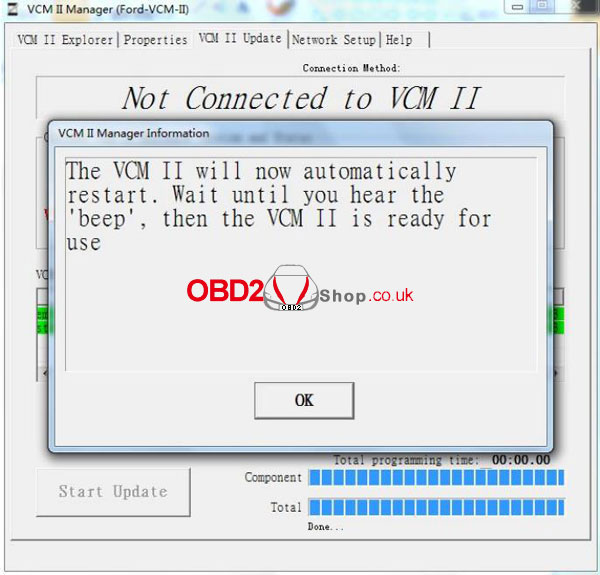
When the upgrade completed, VCM II will automatically restart. Wait until you hear the beep, then the VCMII is ready for use.

recover-vcm2-diagnostic-tool-factory-settings-08


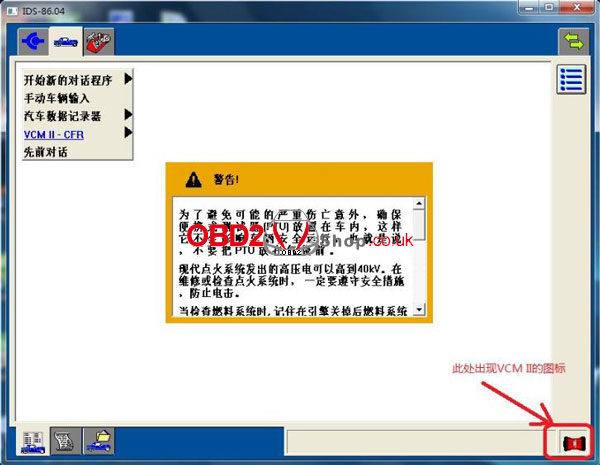
5. Start IDS software, you’ll find a device icon on the right bottom, which means it can be normally used now.

recover-vcm2-diagnostic-tool-factory-settings-09

The solution applies to V98 VCM II, V108 VCMII as well.


Updates:

Thanks to the Obd2shop engineer, the problem was solved!

my VCM2 is able to reconnect to software successfully.

https://www.obd2shop.co.uk/


Thursday 6 May 2021

How to do Cylinder & Engine Speed Test via Thinkcar ThinkDiag?

Today I’m going to use the Thinkcar ThinkDiag device to do some bi-directional tests on a 2015 Chevrolet Suburban. Following I’ll demonstrate how to perform cylinder test & engine speed test.


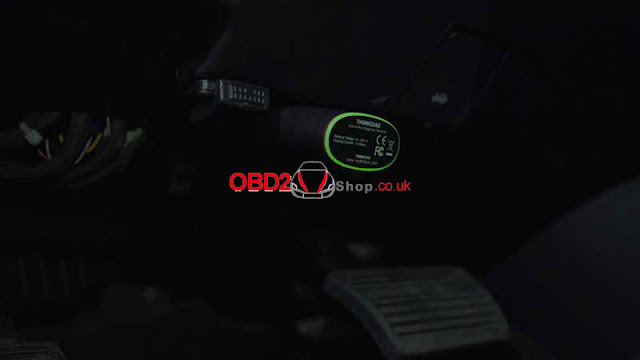
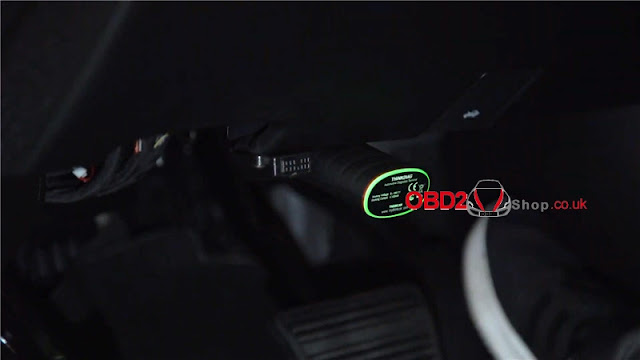
Plug ThinkDiag into the OBD2 port, we’ll hear a beep and see the green light indicating that is connected.

cylinder-engine-speed-test-via-thinkcar-thinkdiag-1

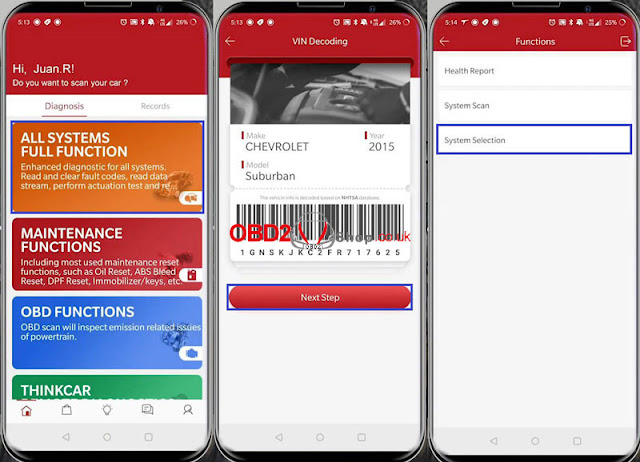
Turn ignition on, press

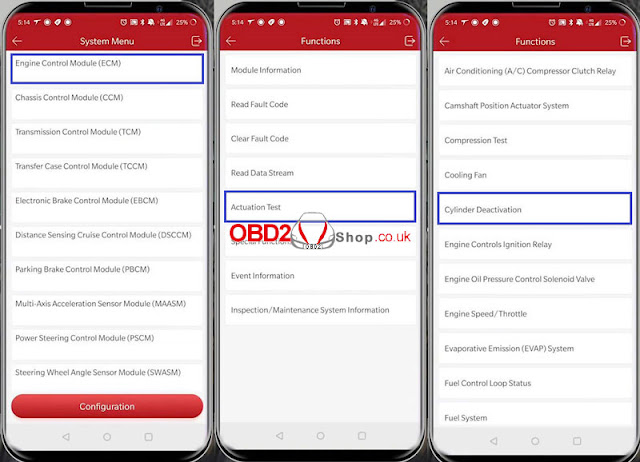
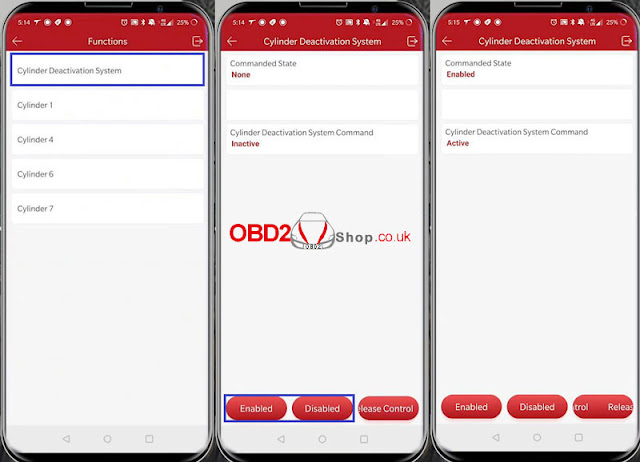
All systems full function >> Next step >> System selection >> Engine control module(ECM) >> Actuation test >> Cylinder deactivation


We can test each cylinder individually here. Turn it on to start the test, the vehicle will turn off automatically.

Cylinder 1 >> On

cylinder-engine-speed-test-via-thinkcar-thinkdiag-2

cylinder-engine-speed-test-via-thinkcar-thinkdiag-3

cylinder-engine-speed-test-via-thinkcar-thinkdiag-4

We can go to test all cylinders here.

Cylinder deactivation system >> Enabled >> Disabled


Let’s go to test the engine speed now.

We’re able to do is actually increase the engine speed at idle, so you can hear it revving up to 2000rpm. 

Press “Release control”, it will just go back to the default position.


Engine speed/throttle >> Engine speed >> OK >> Increase >> Release control

cylinder-engine-speed-test-via-thinkcar-thinkdiag-5

cylinder-engine-speed-test-via-thinkcar-thinkdiag-6

cylinder-engine-speed-test-via-thinkcar-thinkdiag-7

This is using ThinkDiag OBD2 Scanner to do bi-directional tests which is one of the 15 special functions. The powerful & professional functions make it worth the money.

https://www.obd2shop.co.uk/


Thursday 28 January 2021

2015 Chevy Suburban Oil Reset via Thinkcar ThinkDiag

Today I’m going to do an engine oil reset on a 2015 Chevrolet Suburban with this small OBD2 Scanner Thinkcar ThinkDiag. If your oil light comes on or if you’re near a mileage and you need to change the oil. Then you can go ahead and reset it with this device.

So let’s go ahead and do it now:

Insert ThinkDiag into the OBD2 port of Chevy, turn the ignition on.

2015-chevy-suburban-oil-reset-via-thinkcar-thinkdiag-1

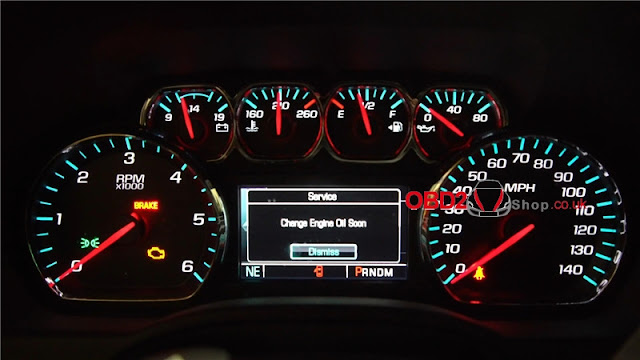
There is a maintenance light “Change engine oil soon” on the dashboard. That is why I’m gonna do it today.

2015-chevy-suburban-oil-reset-via-thinkcar-thinkdiag-2

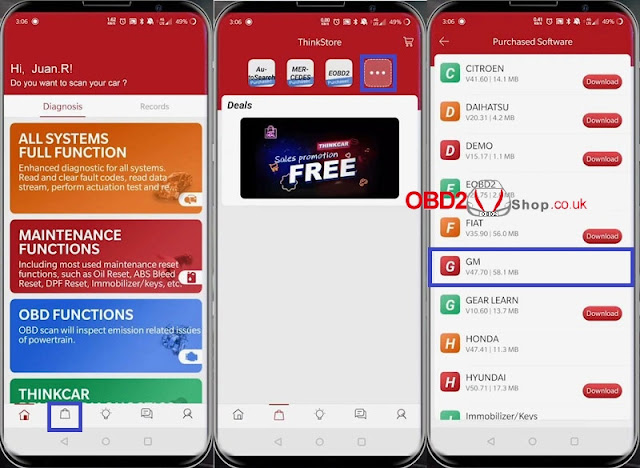
Open ThinkDiag app on a phone.

ThinkStore >> More >> GM >> Automatically search >> Yes >> OK

2015-chevy-suburban-oil-reset-via-thinkcar-thinkdiag-3

2015-chevy-suburban-oil-reset-via-thinkcar-thinkdiag-4

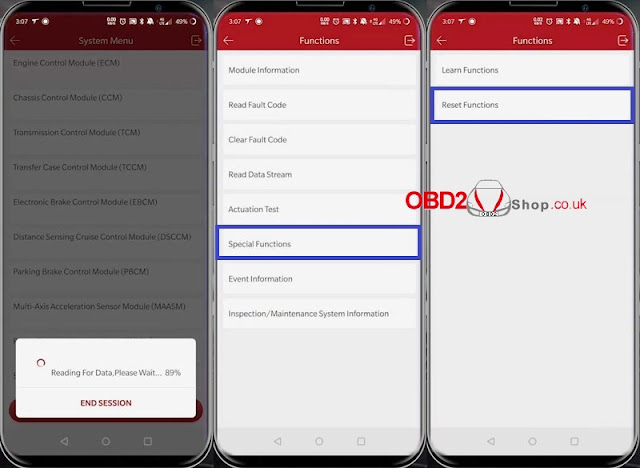
Yes >> System selection >> Engine control module(ECM) >> Special functions >> Reset functions

2015-chevy-suburban-oil-reset-via-thinkcar-thinkdiag-5

2015-chevy-suburban-oil-reset-via-thinkcar-thinkdiag-6

Engine oil life reset >> Engine oil life remaining >> Input a decimal number between 0-100 >> OK >> Continue

Procedure complete, press “OK”.


2015-chevy-suburban-oil-reset-via-thinkcar-thinkdiag-7

2015-chevy-suburban-oil-reset-via-thinkcar-thinkdiag-8

The notification on the dashboard has gone.

The oil set is successful!

2015-chevy-suburban-oil-reset-via-thinkcar-thinkdiag-9

Once we drive 5000 more miles or however long our car is set for, it will get another notification. Just go in there and reset it again after changing the oil.

Thinkcar ThinkDiag is a small powerful diagnostic tool that costs under 100 pounds and it does so many maintenance services like oil reset, steering angle calibration, ABS bleeding, anti-theft matching, tooth learning...and so on.

https://www.obd2shop.co.uk/


Friday 8 January 2021

Vxdiag Subaru SSM-III V2020.07 Free Download + Installation

Vxdiag Subaru SSM-III V2020.07 supports vehicle from 2005-2018, can purchase to add Toyota, Porsche, JLR, Honda software to the device. It is highly compatible with SAE-J2534, has 5 languages for choice: English, Spanish, French, German, Italian. Both 12V/24V gasoline and diesel vehicle are supported.
Download

Free download Vxdiag Subaru SSM-III V2020.07 Software:

https://share.weiyun.com/UJYmB6qe

Password: x5h0zm

Installation

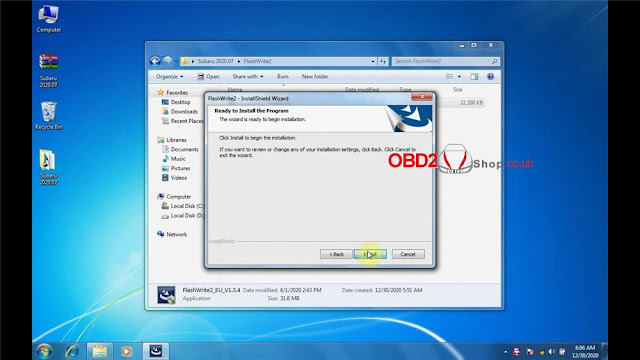
Step 1. Open and unzip file after download, open file in Subaru 2020.07 >> FlashWrite2 >> FlashWrite2_EU_V1.3.4

vxdiag-subaru-ssm-iii-v2020-07-free-download-installation-1

Next >> Accept, next >> Install>> Installing... >> Finish

vxdiag-subaru-ssm-iii-v2020-07-free-download-installation-2


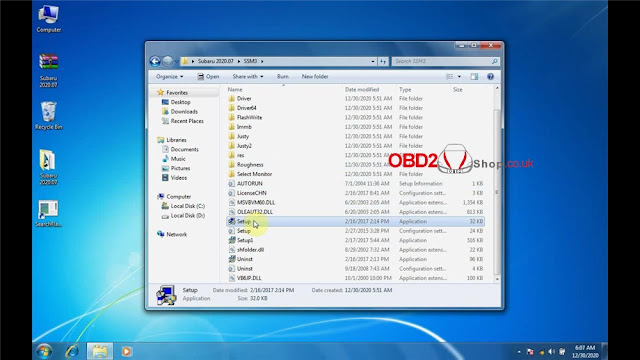
Step 2. Open file in Subaru 2020.07 >> SSM3 >> Setup


vxdiag-subaru-ssm-iii-v2020-07-free-download-installation-3

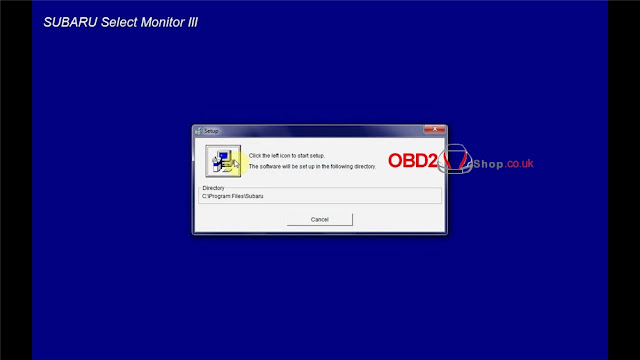
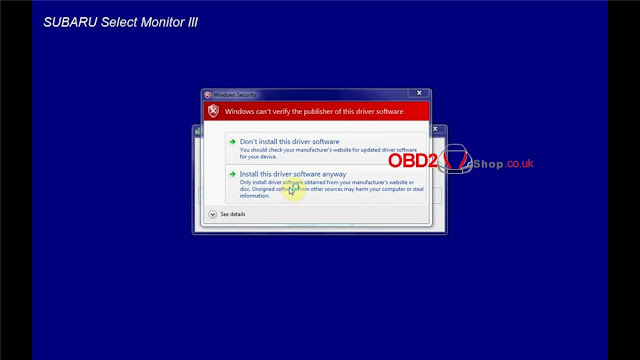
Accept, OK >> Click the left icon >> Install this driver software anyway >> Wait until 100%... >> OK

vxdiag-subaru-ssm-iii-v2020-07-free-download-installation-4

vxdiag-subaru-ssm-iii-v2020-07-free-download-installation-5

vxdiag-subaru-ssm-iii-v2020-07-free-download-installation-6


Step 3. Open file in Subaru 2020.07 >> SSM4 >> SSM4_EU_V22.6.0

vxdiag-subaru-ssm-iii-v2020-07-free-download-installation-7


Next >> Accept, next >> Install >> Installing... >> Finish


vxdiag-subaru-ssm-iii-v2020-07-free-download-installation-8

Step 4. Open file in Subaru 2020.07 >> VX Manager 1.8.1.1012

vxdiag-subaru-ssm-iii-v2020-07-free-download-installation-9

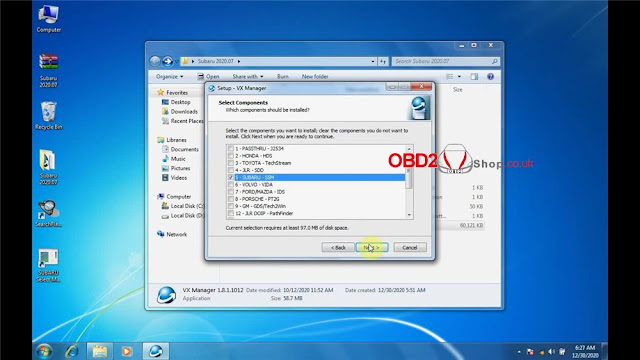
Next >> Select 5-SUBARU-SSM, next >> Installing... >> Install >> Unselect the options, finish

vxdiag-subaru-ssm-iii-v2020-07-free-download-installation-10

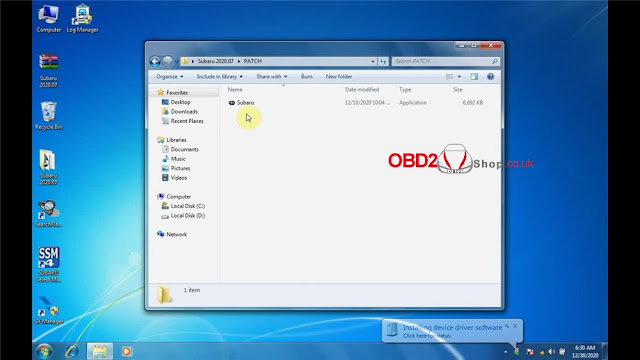
Step 5. Copy file in Subaru 2020.07 >> PATCH >> Subaru to desktop, run it as administrator.

vxdiag-subaru-ssm-iii-v2020-07-free-download-installation-11

vxdiag-subaru-ssm-iii-v2020-07-free-download-installation-12

OK >> OK

Done!

Vxdiag Subaru SSM-III Software V2020.07 Installation Video:


https://www.obd2shop.co.uk/