Wednesday, 24 August 2022

Free Download Techstream Patch to Fix VXDIAG Toyota Connection Error

Problem: VXDIAG VCX NANO for Toyota is unable to connect while programming 1AD-FTV, ADT vehicle. It gives attention: "A communication error with Engine ECU occurred. Please confirm that Engine ECU is properly installed."


The Techstream "Cannot establish communication with the ECU."

"Error: Unable to connect to VIM."


Any advice?

free-download-techstream-patch-to-fix-vxdiag-toyota-connection-error-1

free-download-techstream-patch-to-fix-vxdiag-toyota-connection-error-2

free-download-techstream-patch-to-fix-vxdiag-toyota-connection-error-3

Solution

The reason is because of the patch missing.

Download the Techstream Patch, and the problem can be solved.

Free download link:

https://disk.yandex.com/d/gYz7ExYLfcH_eA


Thanks to www.obd2shop.co.uk, the problem was fixed!


Sunday, 14 August 2022

(Fixed) SVCI J2534 Enter module programming can not work

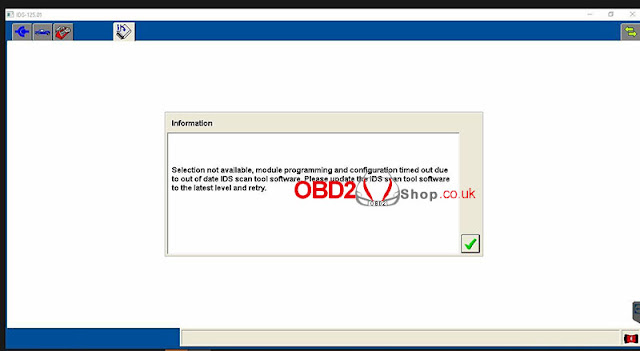
Customer Problem: When using my SVCI J2534 by accessing the programming menu, the software displays a prompt as shown below, what should I do?


fixed-svci-j2534-module-programming-can-not-work-1

fixed-svci-j2534-module-programming-can-not-work-2

Solution:

1. Change the computer date to 2022.05.12

2. Run the "FordExtendProgr" patch

FordExtendProgr download link

https://mega.nz/file/CV4TBK6B#Dbkq0Ow5JXyCO_IAJx5w0Zj6sM-_iqybxmAeweWFI-U

fixed-svci-j2534-module-programming-can-not-work-3

fixed-svci-j2534-module-programming-can-not-work-4


After the repair, open the ids to enter the programming menu and it can be used normally.

fixed-svci-j2534-module-programming-can-not-work-5

Note: After the software is repaired, the computer date can be changed back to the current one without affecting the use.


For more technical services, please pay attention to http://blog.obd2shop.co.uk/

Friday, 5 August 2022

Creator C110+ BMW Code Reader Update

This post will show you how to update your Creator C110+ BMW Code Reader.


Part 1. Creator C110+ BMW Update Tool Download and Install


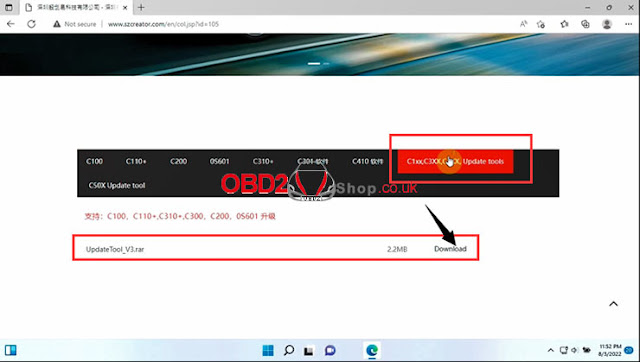
1. Open your browser, enter the URL “szcreator.com”, find “Download” on the website home page → select “C1XX, C3XX, C4XX, Update Tools”, find “UpdateTool_V3.rar” and download it.

creator-c110-bmw-code-reader-update-1

creator-c110-bmw-code-reader-update-2

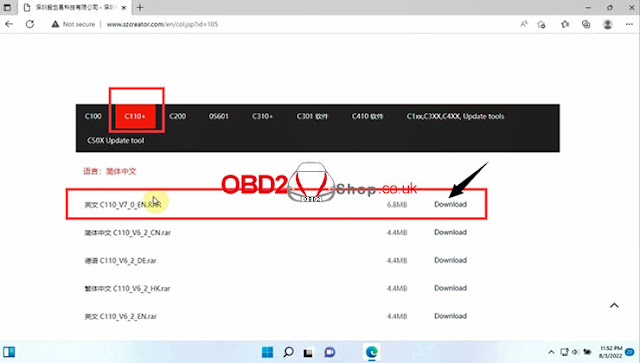
2. Still on the current page, click on "C110 +", find "C110_V7_0_EN.RAR" and download it.

creator-c110-bmw-code-reader-update-3

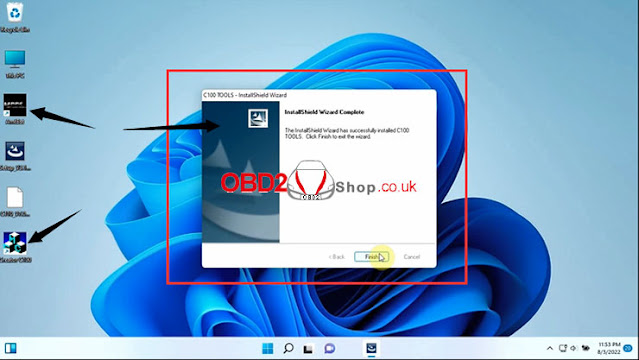
3. Unzip the following two files and install them on your desktop.

creator-c110-bmw-code-reader-update-4

4. Open and run "UpdateTool_V3", and follow the instructions, at the end of the installation, the icon will appear as shown in the figure.

creator-c110-bmw-code-reader-update-5

Part 2. Creator C110+ BMW Code Reader Update


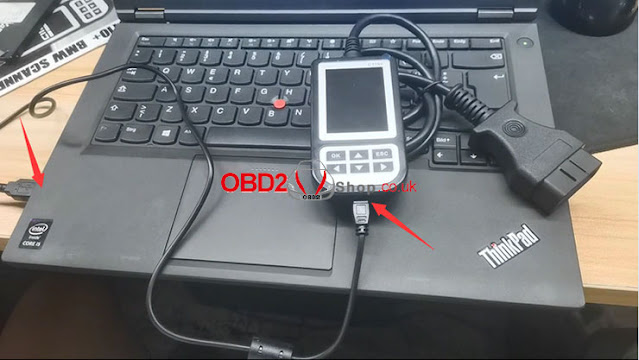
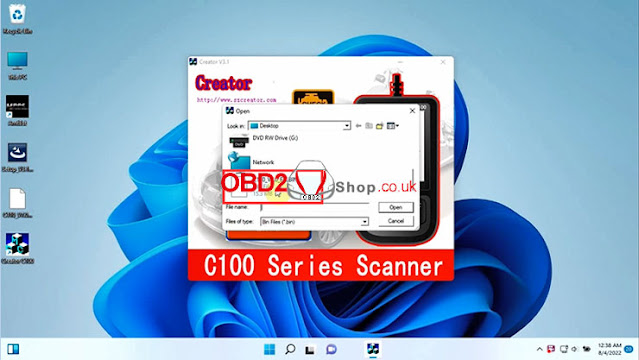
Connect Creator C110 + to computer via USB cable, open "Creator C110" icon, select "Update", then select "C110_V7_0_EN.RAR" to do the update.

creator-c110-bmw-code-reader-update-6

creator-c110-bmw-code-reader-update-7

creator-c110-bmw-code-reader-update-8


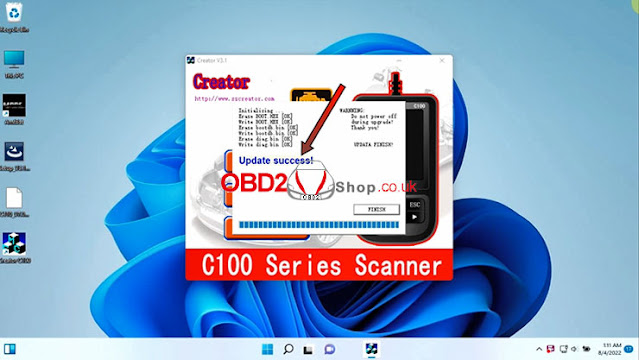
The update is complete!

creator-c110-bmw-code-reader-update-9

For more detailed steps, refer to this video:


Wednesday, 3 August 2022

SD/HDD V2022.06 Upgrade & Free Download Replace File

The latest V2022.06 SSD Software/ HDD Software has been updated, and is compatible with MB SD C4 Plus, SD Connect C5, and Super MB PRO M6 diagnostic tool. Users can run Xentry in either of the following ways: login account or replace the file.

sd-hdd-v2022-06-upgrade-free-download-1

New Features

1. Fixed garbled problem after changing language by DAS.

2. Upgraded WIS & StarFinder

3. EWA web password changed to "12345".

4. EPC needs to be accessed through EWA and WIS from the desktop shortcut.

5. Users should log in offline account when starting Xentry each time, and close from the top right corner directly.

6. If do not want to log in, follow the steps below to replace file. After successful replacement, user should run "Diagnosis Stop" to close Xentry.


How to use Xentry via login account?

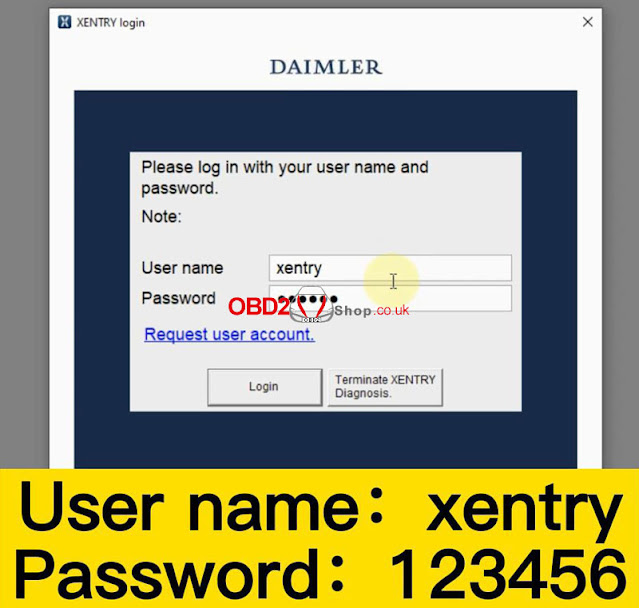
1. Run "XENTRY Diagnosis Cars-offline" software.

2. Enter user name: xentry, password: 123456.

3. To exit Xentry, click close button on right top corner.

sd-hdd-v2022-06-upgrade-free-download-2

sd-hdd-v2022-06-upgrade-free-download-3

sd-hdd-v2022-06-upgrade-free-download-4


How to use Xentry via replacing file?

Free download replaces file:

https://mega.nz/folder/5tchia4b#gXt9kvWltn9P_SczyYgmPg

sd-hdd-v2022-06-upgrade-free-download-5

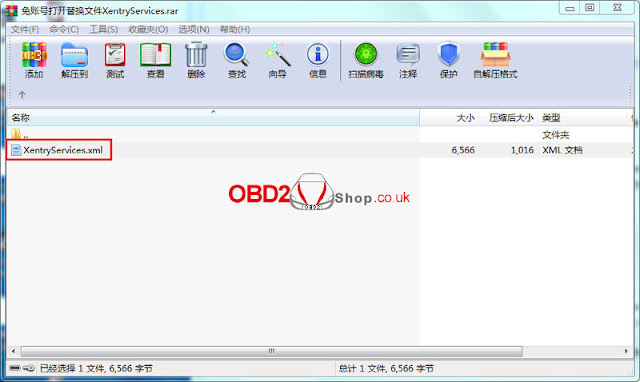
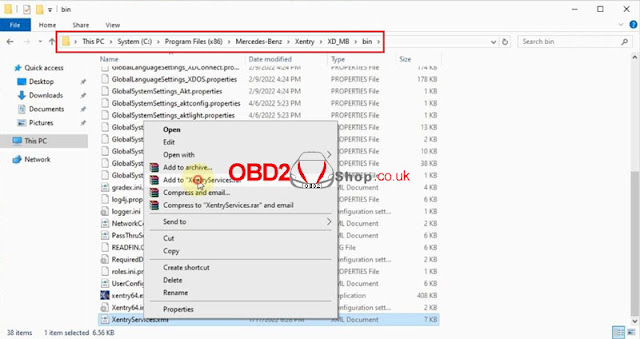
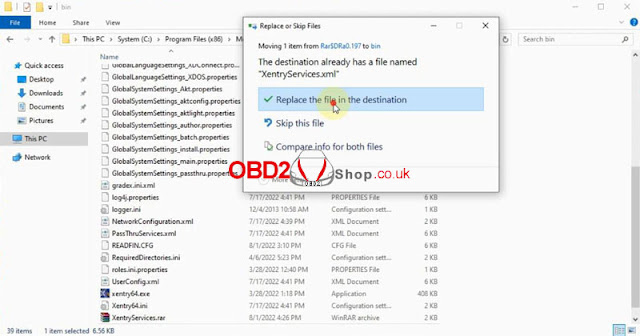
1. Locate "XentryServices.xml" file: System(C:)/Program Files/ Mercedes-Benz/ Xentry/ XD_MB/ bin/;

2. Add the file to rar format, replace downloaded file into the folder.

sd-hdd-v2022-06-upgrade-free-download-6

sd-hdd-v2022-06-upgrade-free-download-7


3. Locate "XentryServices.xml" file: System(C:)/Program Files/ Mercedes-Benz/ Xentry/ XD_DT/ bin/;

4. Add the file to rar format, replace downloaded file into the folder.

sd-hdd-v2022-06-upgrade-free-download-8.jpg

5. Now you can start XENTRY Diagnosis Cars-offline/ Trucks-offline directly, but should exit by running "Diagnosis Stop".

www.obd2shop.co.uk


Sunday, 17 July 2022

VOCOM II Mini WiFi Setup & Firmware Update Instruction

VOCOM II Mini is a wireless device that supports to diagnose Volvo heavy duty truck via WiFi. Small and portable, no need wires. This is an initial guide on WiFi setting & firmware upgrade. 


How to setup Volvo VOCOM 2 WiFi?

1. Power on the Mini Vocom2 dongle and the lights will be flashing. Find the WIFI signal Vocom2D_******* from laptop. Click "Connect".

vocom-ii-mini-wifi-setup-firmware-update-instruction-(1)

2. Input “v2d+ SN num”, SN number is 7 digits which you can find it from backside of the VOCOM2 dongle. Then click "OK" and done.

vocom-ii-mini-wifi-setup-firmware-update-instruction-(2)

How to update Volvo VOCOM 2 firmware?

Note: Make sure the Mini Vocom2 is powered up by 24V ECU or truck. Low voltage will affect the upgrade process.

Follow the path: 

All Programs >> VOCOM II >> VOCOMII Configurator >> Setting >> Advanced >> Update device firmware >> Update button

vocom-ii-mini-wifi-setup-firmware-update-instruction-(3)


vocom-ii-mini-wifi-setup-firmware-update-instruction-(4)

vocom-ii-mini-wifi-setup-firmware-update-instruction-(5)

vocom-ii-mini-wifi-setup-firmware-update-instruction-(6)


It'll run the TECH TOOL automatically when firmware update finished...

vocom-ii-mini-wifi-setup-firmware-update-instruction-(7)

vocom-ii-mini-wifi-setup-firmware-update-instruction-(8)

Log in then it's done.

vocom-ii-mini-wifi-setup-firmware-update-instruction-(9)

vocom-ii-mini-wifi-setup-firmware-update-instruction-(10)

http://blog.obd2shop.co.uk/vocom-ii-mini-wifi-setup-firmware-update-instruction/


Sunday, 3 July 2022

J518 ELV Module Emulator Instruction for Audi C6 Q7 A6

This is an operation instruction on how to use J518 ELV Module Emulator to repair Audi C6 Q7 A6 steering column lock.  


Steps for 9S12DG 128 CPU Car

1. Read out EEPROM data with VVDI PROG. Remember to backup the data in case of operation mistake.

2. Put EEPROM file into "EEPROM 2K-4K" folder

j518-elv-module-emulator-for-audi-c6-q7-a6-1

图片1, then double-click EEPROM converter application. The 2K file will start transforming. Once the file has changed to be 4K, which means conversion is successful.


Note: Can only double-click one time, please DO NOT repeat. If the operation or conversion failed, right-click to run the program in administrator mode.

j518-elv-module-emulator-for-audi-c6-q7-a6-2

j518-elv-module-emulator-for-audi-c6-q7-a6-3


3. Connect flashing wire to write the converted EEPROM file.

Note: Please select J518(2010)(0L01Y) for 256 chip simulator.

(Each J518 ELV Simulative Board is with EEPROM & Flash data, usually users just need to write EEPROM. If not, can also write original car EEPROM plus FLASH data in instruction.)


Steps for 9S12DG 256 CPU Car

1. Read out & save the original car data.

2. Write data directly to J518 simulator.


Connection

VVDI burning line:

Red(thick) - VCC

Black(thick) - GND

Yellow - RST

Purple - BKGD

Green - XCLKS

White - CLK

Black(thin) - GND-C


Without Horn Wiring Diagram

Buy solder-free burning line from us, can plug into 20pin port directly.

j518-elv-module-emulator-for-audi-c6-q7-a6-4

With Horn Wiring Diagram

Simply connect according to the marks on board.

j518-elv-module-emulator-for-audi-c6-q7-a6-5


Note:

1. It's more recommended to test on vehicle after successful written.

2. To test on bench, make sure the connection on 20PIN port is correct. For wrong connection may cause chip damaged.

Eg. 

Wrong connection: 10PIN position (red marked) 

Correct connection: 20PIN position (blue marked)

j518-elv-module-emulator-for-audi-c6-q7-a6-6


http://blog.obd2shop.co.uk/j518-elv-module-emulator-instruction-for-audi-c6-q7-a6/


Thursday, 12 May 2022

Hot 4 Injector Cleaner & Tester Machine 2022, How to Choose?

Here Obd2shop.co.uk have collected the latest hot injector cleaners & tester machines in 2022. Covering 4-cylinder & 6-cylinder machines from Summary, Autool, Launch, Tektino. By making a list of the differences to help consumers make a better choice.


Hot 4 4-Cylinder Injector Cleaners

Summary vs. Autool vs. Launch Comparison


Hot 4 6-Cylinder Injector Cleaners

Summary vs. Autool vs. Launch vs. Tektino Comparison

Conclusion

From the comparison table, Summary supports the most features while other brands are not or less.

However, remember to make sure the injector cleaner you're purchasing is work for your car. As choosing an appropriate machine can greatly save money than going to maintenance.

Article source: http://blog.obd2shop.co.uk/hot-4-injector-cleaner-tester-machine-2022-how-to-choose/